These paper stars might look very complicated....but remember looks are deceptive! So, learn the very very easy way to make these beautiful decorative stars with pictures, below.
Material Required:
STEP 1:
Cut the paper in 6 equal squares. I have cut them in 4 inch by 4 inch. If you want a bigger star you can cut bigger squares.
STEP 2:
Make the first fold by folding the paper diagonally as shown below:
STEP 3:
Second Fold - Fold it on the previous fold (the diagonal) in half so that the far opposite corners are joined. As shown in the picture below:
STEP 4:
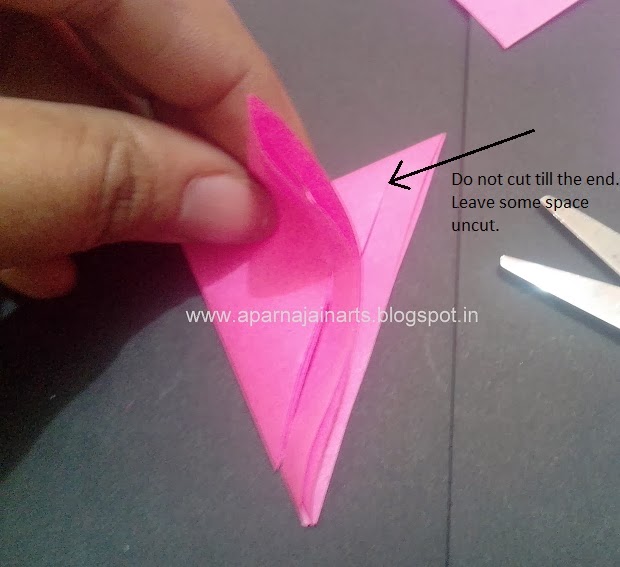
Cutting - You have to make five cuts in the paper as shown below. BUT make sure you make the cuts from the folded side and not from the open side.
When you open the folded square back, it will look like this*:
STEP 5:
You flip the piece now, and paste the edges of the next suare on the opposite direction i.e. the Side 2 - as shown in the picture below:
Similarly, you flip the piece again, paste the next two edges on Side 1 - as shown below:
Again, flip, paste, towards Side 2 - as shown below:
And once you are done, your one petal will look like this:

STEP 6:
Joining the Petals - As shown below in the picture glue two petal together at two places:
Resulting in some thing like this:
Keep on adding the petals in similar fashion to get the full star:
PLEASE NOTE: The brown star has five petals and the pink one has six. The reason for this i had no space left in the brown star to add the 6th petal (probably as it is bigger in size!) :)
*Also in the while cutting for brown star I have made 6 cuts in each square (5 in pink) as it was a bigger size. So you can customize your stars as per your need and aesthetics!!
Do not forget to leave your comments below, if you have any query regarding this!! Till then...
Have Fun and Keep Crafting !! :) :) :)

Material Required:
- Paper - your choice
- Glue
- Scale
- Scissors
- Thread
STEP 1:
Cut the paper in 6 equal squares. I have cut them in 4 inch by 4 inch. If you want a bigger star you can cut bigger squares.
STEP 2:
Make the first fold by folding the paper diagonally as shown below:
STEP 3:
Second Fold - Fold it on the previous fold (the diagonal) in half so that the far opposite corners are joined. As shown in the picture below:
STEP 4:
Cutting - You have to make five cuts in the paper as shown below. BUT make sure you make the cuts from the folded side and not from the open side.
When you open the folded square back, it will look like this*:
STEP 5:
Pasting - I have explained this (to make it simple) by marking the pics with Side 1 and Side 2.
You take the edges of the inner most square and paste them with glue (as shown below) on Side 1.
You flip the piece now, and paste the edges of the next suare on the opposite direction i.e. the Side 2 - as shown in the picture below:
Similarly, you flip the piece again, paste the next two edges on Side 1 - as shown below:
Again, flip, paste, towards Side 2 - as shown below:
And once you are done, your one petal will look like this:

STEP 6:
Joining the Petals - As shown below in the picture glue two petal together at two places:
Resulting in some thing like this:
Keep on adding the petals in similar fashion to get the full star:
PLEASE NOTE: The brown star has five petals and the pink one has six. The reason for this i had no space left in the brown star to add the 6th petal (probably as it is bigger in size!) :)
*Also in the while cutting for brown star I have made 6 cuts in each square (5 in pink) as it was a bigger size. So you can customize your stars as per your need and aesthetics!!
Do not forget to leave your comments below, if you have any query regarding this!! Till then...
Have Fun and Keep Crafting !! :) :) :)


No comments:
Post a Comment